Before creating the questions, it is important to think about the organization of your questionnaire. For example, if you are conducting a store audit, you can organize topics by industry. In cases of quality inspections, the technical sheet can be divided between general aspects and defects, for instance.
Also, if you are creating a questionnaire with scores, that score will be split between created topics and you can customize the weights however you want, as long as the sum value of all topics does not exceed 100.
Check it out in this article:
- Configuring topics and questions
- Adding a simple question
- Configuring questions already included in the topic
- Configuring topics
Configuring topics and questions
Step 1: After you complete the initial settings of your questionnaire, click "Next". The system will open the Topics screen. In this moment, start by naming the first topic in the field "Topic 1". You can click  to include name translations.
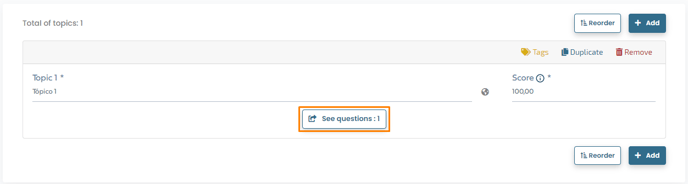
Step 2: The value of the Score field is automatically filled in and it will be recalculated each time a topic is added. You can assign different weights to topics after adding them.
Step 3: Click on the button ![]() (highlighted in the image above). The system will open the Questions screen and you can start filling in the main field with the question or description of the item that the question is about. You can click to include translations.
(highlighted in the image above). The system will open the Questions screen and you can start filling in the main field with the question or description of the item that the question is about. You can click to include translations.
If you want, you can select a question with previous configurations, just click on ![]() button. You can choose one of the options in the list displayed by the system (image below).
button. You can choose one of the options in the list displayed by the system (image below).
When you select them, the preconfigured question will be included in the topic and you will be able to customize some details, however, the common fields will be blocked.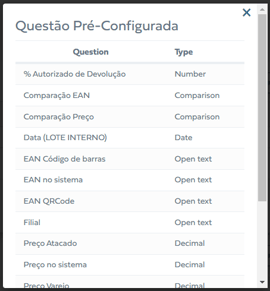
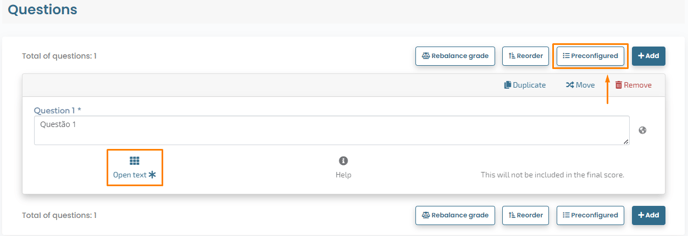
Step 4: To add a question without prior configuration, click on ![]() (highlighted in the image above). The system will display new fields. Click
(highlighted in the image above). The system will display new fields. Click  to select the Question Type. You will need to choose one of the options below.
- Sampling: it is the type that requires more settings. It is indicated for the detailed evaluation of a product sample, informing percentages of defects, maturation and caliber of products, for example.
- Digital Signature: Enables the evaluator to enter their digital signature with their finger or rubber-tipped pen. It's usually the kind of question that ends an inspection.
- Calculation: allows including a mathematical formula to be applied to the values indicated in other numerical questions of the questionnaire. To configure it, it is necessary to select at least one existing numerical question and include a formula with basic mathematical operations, such as [1.]*100/[1.2], for example. It allows configuring note calculation from intervals.
- PariPassu Code: enables the reading of PariPassu tracking QR codes, also allowing the typing of the code to identify a product.
- Barcode: enables reading or typing of barcodes to identify a product.
- Comparison: it is similar to the calculation question, however, the result presented is not numerical, but "true" or "false". For this, it is necessary to indicate the questions to be compared, an operation (equal to; greater than; less than, etc.) and a mathematical formula.
- Date: indicated for any situation that requires the control of a maximum limit of days. I have included a field for date information, which is automatically filled in with the application date. Allows you to configure day limits and customize an alert message.
- Date/time: more indicated when there is a need to only inform date and time for any purpose. It does not allow setting limits.
- E-mail: consists of a text field containing the guidance "Type the e-mail", specifically intended for this information.
- Simple choice: it allows including several alternatives, where the evaluator can select only one. For each alternative it is possible to indicate the percentage reached of the maximum score.
- Multiple choice: allows including several alternatives, where the evaluator can select one or more options. For each one, it is possible to indicate the percentage reached of the maximum score.
- Time: includes a field for time information, allowing you to configure the inclusion of start and end time.
- Numerical: includes a field to fill in numerical values, exclusively, allowing the configuration of the calculation of the grade based on intervals.
- Calculated percentage: it is similar to the sampling question, allowing the creation of fields for percentage information, but without as many customization possibilities. Typically, using the sampling type is preferred.
- Phone: includes field for phone number information.
- Open text: includes a field for free typing, ideal for including the evaluator's general observations. It is possible to configure minimum and maximum characters.
Only single-choice, multiple-choice, numerical, sampling or calculation questions can generate a score in the questionnaire.
Adding a single choice question
Step 1: Let's select the type of question "Simple choice". This type of question allows the calculation of the grade considering the alternatives.
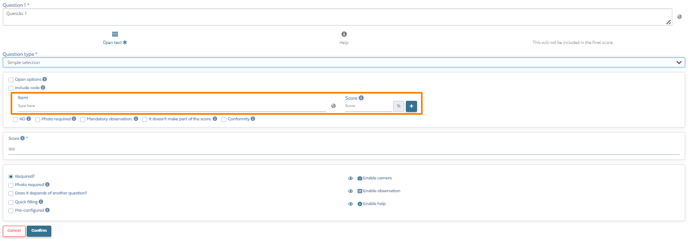
Step 2: In the Item and Note fields, you must add the alternatives one by one.
Thinking about a store audit, for example, let's consider the alternatives to be Compliant, Not Compliant and Not Applicable, but you can use the terms that best suit your needs.
- In this case, fill in the Item field with the term Compliant, the Note field with the percentage 100 and click
 .
. - Then fill in the Item field with the term Not Compliant, the Note field with the percentage 0 and click .
- Finally, fill in the Item field with the term Not Applicable and check the checkbox
 just below the field. Always mark this option in alternatives that should not be considered in the calculation.
You can include other terms and further divide the grade, for example: Good with 100%; Regular with 50% and Bad with 0%. It all depends on how you want to view the data in the inspection reports.
Step 3: You can perform settings when adding the alternative by checking the checkboxes below the Item and Note fields, or after adding, using the columns. See below what each of them means:
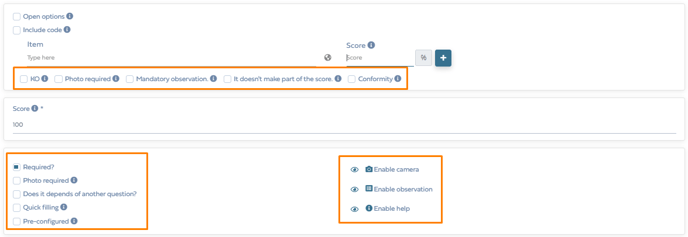
KO → Alternatives with knockout setting automatically reset the topic when selected. Configure the knockout in issues related to critical items, which cannot be non-compliant.
Photo required → When this option is selected, it requires the evaluator to insert an image when completing the questionnaire.
Mandatory observation → When this option is selected, it requires the evaluator to enter information when filling out the questionnaire.
Conformity → Functionality that allows you to control previous answers from the same evaluated person.
Open options → Check to enable the evaluator to include an option in addition to those configured. In this case, no grade calculation takes place.
Include code → Check to link a code to the alternatives, so it is possible for the evaluator to answer the question from a barcode or QR code reading. You will need to fill in the code in the field displayed next to the item.
In the Generate action plan option, you can link an alternative to an action plan related to correcting a non-compliance.
Step 5: Finally, you can perform the following settings:
Required? → This option is automatically checked and indicates that the question is mandatory. At the time of application, the questionnaire cannot be completed if the answer to this question is not completed.
Photo required → Check so that the system requires the inclusion of an image in the question, without link to a specific alternative.
Does it depends of another question? → Check for the question to be displayed only after the evaluator answers a previous question (which you must select). It is possible to create a dependency with one or more alternatives.
Quick filing → Check so that the question is automatically filled in with the same data as in the previous application.
Pré-configured → This option should only be checked if you want to make the question a pre-configured option, an action that cannot be undone. Make only recurring questions in your surveys pre-configured.
Enable camera → Click on the icon  to disable the camera function in questions without mandatory inclusion of a photo.
Enable observation → Click on the icon to disable the function that allows the evaluator to add a note to the question.
Enable help → Click the icon to disable access to question help information.
Step 6: After finishing the settings, don't forget to click on the ![]() button of the question section. If you just click the confirm button on the page, the question changes will be lost.
button of the question section. If you just click the confirm button on the page, the question changes will be lost.

Step 7: To add more questions, click ![]() . If you want to create a new question with settings similar to the question already added, click on
. If you want to create a new question with settings similar to the question already added, click on  and adjust as necessary.
After all the questions be included in the topic, you can still take some configuration actions.
Configuring questions already included in the topic
Step 1: In single or multiple choice and numerical questions it is possible to assign  . They are used when, in addition to the total grade of the application, there is a need to obtain a specific score for a type of question or topic.
Step 2: The button  allows you to move the question between topics in your questionnaire. In case you need to create questions with similar configuration in different topics, you can use the duplicate and move functionality.
Step 3: By clicking on the button ![]() , you will be able to register an orientation about the question that will help the evaluator during the inspection. The system will display the pop-up on the side, where you can include text, an image or PDF.
, you will be able to register an orientation about the question that will help the evaluator during the inspection. The system will display the pop-up on the side, where you can include text, an image or PDF.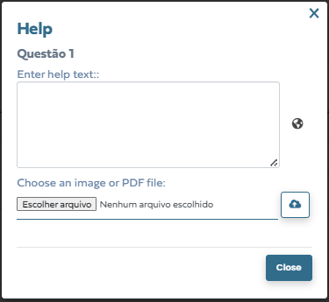
Step 4: The button ![]() divides the total weight of the topic equally among all questions with grade calculation. You can quickly check the weight of each question with grade calculation by looking at the information highlighted by the arrow in the image above.
divides the total weight of the topic equally among all questions with grade calculation. You can quickly check the weight of each question with grade calculation by looking at the information highlighted by the arrow in the image above.
Step 5: The button ![]() allows you to organize the order of the questions easily, just click, hold and drag each item to the desired spot.
allows you to organize the order of the questions easily, just click, hold and drag each item to the desired spot.
Step 6: After completing the topic settings, click ![]() , at the bottom of the page.
, at the bottom of the page.
Done! The topic is created. Now, see how you can configure the topics.
Configuring the topics
The topic listing screen has some of the same buttons as the questions screen. Check out the step-by-step below to see how to set up the topics.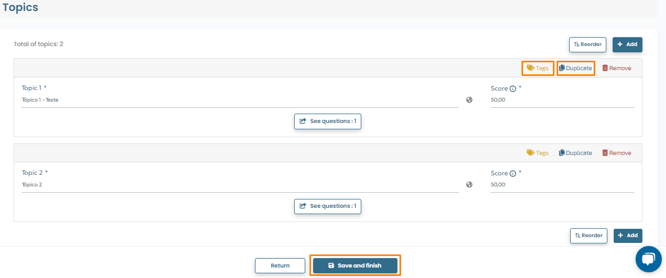
Step 1: You can add to assign a criterion to an entire topic, making it possible to establish an average between topics.
Step 2: If your questionnaire needs to be divided into topics with similar questions, click on  to speed up the settings.
Step 3: In the Note field, you can check the weight of the topic in relation to the others. The total sum must always be 100, but you can assign different weights to topics.
The system will consider all weight and tags settings by question and by topic to calculate the inspection score.
Step 4: To add a new topic, click ![]() . To rearrange the topics, click on
. To rearrange the topics, click on ![]() , select and hold the desired topic, dragging it to the desired point.
, select and hold the desired topic, dragging it to the desired point.
Step 5: To finish, click ![]() . Your questionnaire is ready!
. Your questionnaire is ready!
We hope this article was helpful to you! 🍎
If you have any questions, CLICK HERE to contact our Customer Success team! We will be happy to assist you! 🤗💙
See you! 🖐️